The Setup
I've been using routers on CNC machines for years... tolerating their high-pitched whine in exchange for relative ease-of-use. Then, my trusty Dewalt DWP611 Mounted to my largest CNC machine caught fire, leaving me to question my use of routers. I'd been cutting the aluminum with the router for hundreds of hours before it gave out, but the low cost of Chinese spindles with accompanying Huanyang inverters finally became too lucrative.
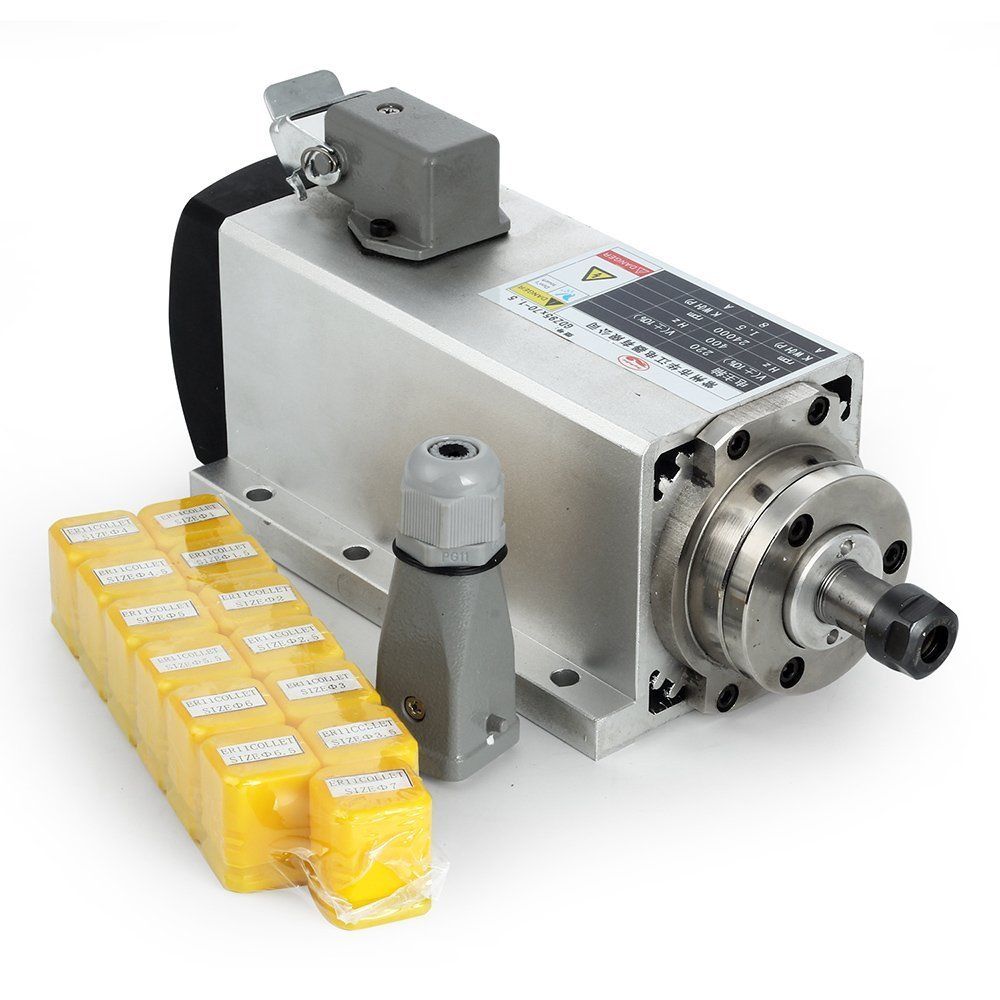
Here's the exact setup I purchased: a 110V HuanYang Inverter with a "Changzhou Hua Jiang Electric Appliance Co., LTD" 1.5KW Air-cooled spindle. I opted for air-cooled (rather than water-cooled), to minimize the complexity of the set-up. The trade-off here is that I can't run the spindle at low-speed for long periods of time, for fear of the system overheating. I also purchased an imperial (...no metric in my shop) set of ER11 Collets. While ER11 is rather small, maxing out at 5/16" end mills, I mostly use this machine for prototyping in aluminum, so I can afford to take smaller depth-of-cut (DOC) and width-of-cut (WOC) at cost of time and material-removal-rate (MRR). Needless to say, any DIY machine is not something to trust your business with.
Inverter Wiring
Post I've read online make wiring these inverters seem FAR more complicated than it actually is. There are plenty of guides for wiring these inverters/VFD's for 220V, but not too much for wiring the 110V versions. As a disclaimer, though, consult an experienced electrician; use this article at your own risk.
These inverters have three AC inputs: R, S, and T, and have three three-phase outputs: U, V, and W. Wire the hot and neutral of your 110V line to any two of R, S, and T, wiring the ground to the ground pin on the far right. Then, your VFD is ready to fire up. Make sure to program the inverter BEFORE moving onto the next steps. Do NOT wire your AC inputs into the wrong terminals, or you won't have your inverter for very long. Below you can see the basic wiring.
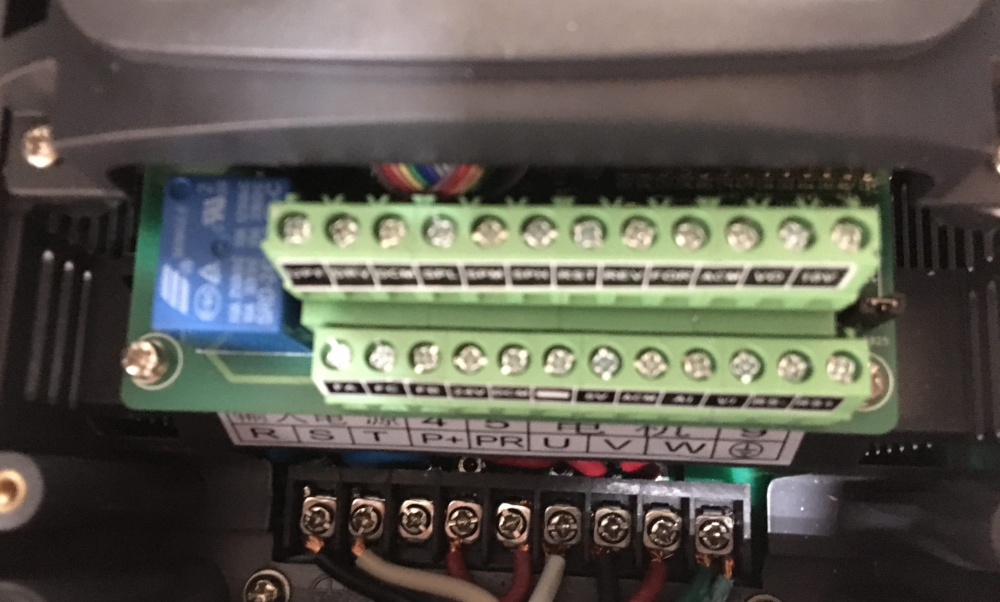
Once you've programmed your spindle (see the next section), you're ready to wire your spindle. Almost all spindles have three lines (one for each phase) and a ground. Wire U, V, and W to the three live wires, and connect the ground as well. If your spindle is like mine, the connector may have a connector with five pins, so you'll have to open up the connector to figure out how your spindle is wired. Once this is done, your spindle and inverter are ready to go! If you want to get your spindle connected to Mach3, see the last bit of this post.
Programming
There are a lot of things that need to be programmed BEFORE you wire in your spindle (250 different program codes, to be exact), so take your time programming and make sure you understand what each setting does. You don't want to burn your spindle out, unless you like waiting on snail-mail from China. I encourage you to check the manual... despite the frequent Chenglish, this is one of the most well thought-out and detailed manuals I have ever seen from a no-name Chinese product purhcased off Ebay.
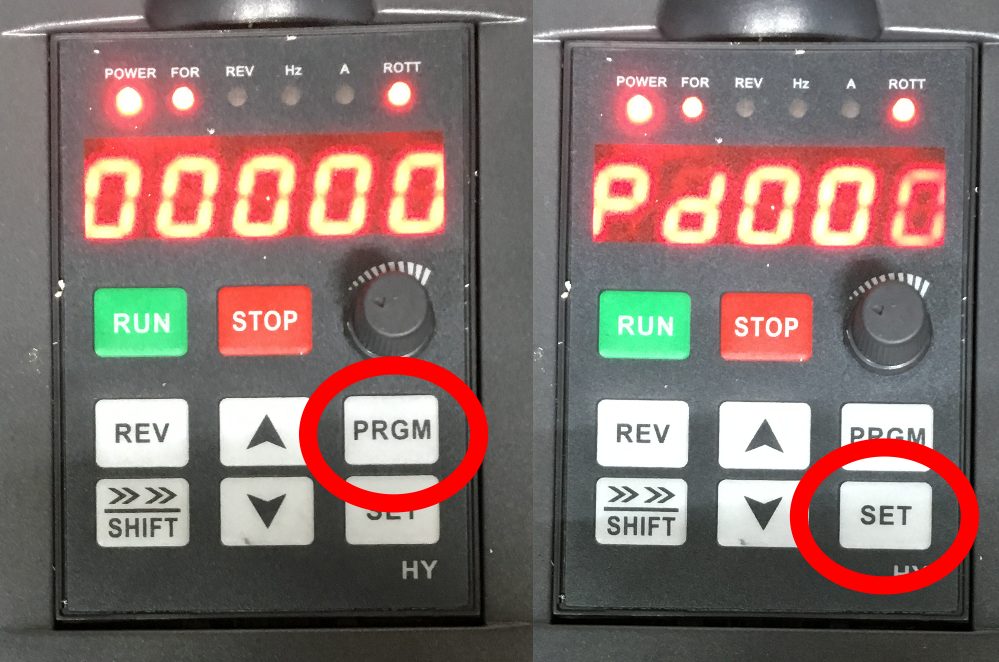
Programming the Huanyang VFD is pretty simple if you know how to do it. From the start screen (shown at left), hit the PGRM key. This will bring up the Program menu (shown at right). Use the Up/Down arrows to navigate to the program you want. Note that hitting the SHIFT key will move the cursor left by one space so you aren't hitting the Up/Down keys all day. Hit enter when you are on the Program you want, set the value using the arrow and shift keys, and hit enter again to save the value.
Here are the important settings and what I set them to:
- PD0: Parameter Lock (Set to 0)
- PD1: Source (O for using the buttons; 1 for the pot. on the front; 2 for using an input from Mach or another control) -- 2 in my setup
- PD2: Motor Frequency (Check your spindle nameplate) -- 400Hz in my setup
- PD8: Operating Voltage (Your mains voltage correct for the inverter) -- 110V in my setup
- PD14: Accel time 1 (Acceleration time of filit step (four steps total)) -- 1sec in my setup
- PD16: Accel time 2 -- 1sec in my setup
- PD18: Accel time 3 -- 1sec in my setup
- PD20: Accel time 4 -- 1sec in my setup
- PD15: Decel time 1 (Decelartion time of first step (If you quick braking, you'll need a braking resistor)) -- Not relevant for me since I'm using coasting stop
- PD17: Decel time 2 -- Not relevant for me since I'm using coasting stop
- PD18: Decel time 3 -- Not relevant for me since I'm using coasting stop
- PD19: Decel time 4 -- Not relevant for me since I'm using coasting stop
- PD26: Braking Stop -- Set to 0 for braking or 1 for coasting
- PD141: Motor Voltage (Check your spindle nameplate)-- 110V in my setup
- PD142: Motor Amperage (Check your spindle nameplate)-- 7A in my setup
- PD143: Number of Motor Poles (Check your spindle nameplate)-- 2 in my setup
- PD144: RPM -- The number you enter here is x = m/(100*f*p), where x is this setting, m is motor RPM (check your nameplate), f is frequency (PD3), and p is number of poles (PD143)
- PD163: VFD Address -- Set to 1-250 for using with Mach
- PD164: Baud Rate -- Set to 1 for 9600
- PD165: Communication Method -- Set to 3 for RS485 with Mach
Setting Up for Mach3
CNC machines are cool because they're automatic... so don't turn on your spindle manually! We have automation for that. You'll need some sort of analog input (preferably 0-10V) in order to automatically change the frequency, and thus the speed, of your spindle.
In my setup, I'm using a UC400ETH along with 2 Five-Axis Breakout Boards from BuildYourCNC. This unfortunately means that I had to add another component to get my analog control to change the frequency. This little RS485 component will do the trick.
In order to get your RS485 talking to Mach3, you will need to install the Mach3 driver. This was downloaded off of the Mach3 Forum and is not my code. You can also download here. The attached manual will quickly get you started!